Create and activate a workspace from Super Admin
Follow this guide from customer creation to the first POS login. A workspace is one business, including all stores allowed by its plan. Preparing a record reserves its identity and saves a plan snapshot; installation, owner setup and access checks happen afterward.
Instructions checked against the current source on 5 October 2026. Example names, domains, dates and paths below are illustrative. Use the values displayed by your own installation.
1. Check the platform prerequisites
- Sign in to the separate Platform Super Admin panel on its HTTPS hostname. Use the platform password, which can differ from the original Hyper-POS owner password.
- Complete Settings → Platform, Currency, Defaults and Email. Send a test email and confirm delivery.
- Have at least one active customer and one published plan. A saved draft plan is unavailable for workspace preparation.
- Confirm the hosting mode: shared hosting requires manual domain/database preparation; a configured VPS runner handles its approved provisioning jobs.
- Check scheduler and database queue health. In demo mode, creation and setup actions are disabled and rejected by the server.
- Use an approved release and hosting profile. Current native cPanel/VPS production acceptance remains pending; local implementation checks do not establish hosting support.
Example used throughout this guide
| Item | Example | Meaning |
|---|---|---|
| Platform hostname | platform.example.com | Central administration and subscriber portal. |
| Subscriber base domain | shops.example.com | Configured during platform setup; do not include a scheme or wildcard. |
| Customer | Asha Shah · asha@example.com | An active customer in platform management. |
| Workspace name / slug | Asha Retail / asha-retail | Resulting shared hostname: asha-retail.shops.example.com. |
| Plan | Starter, published version 1 | For illustration: a free plan with one store, three users and one terminal. Use limits available in your plan editor. |
| Workspace currency / timezone | INR / Asia/Kolkata | POS base currency and local business time; separate from platform billing display. |
| First store | Asha Retail Main / MAIN | The first store inside this workspace, not a second workspace. |
2. Create or select the customer
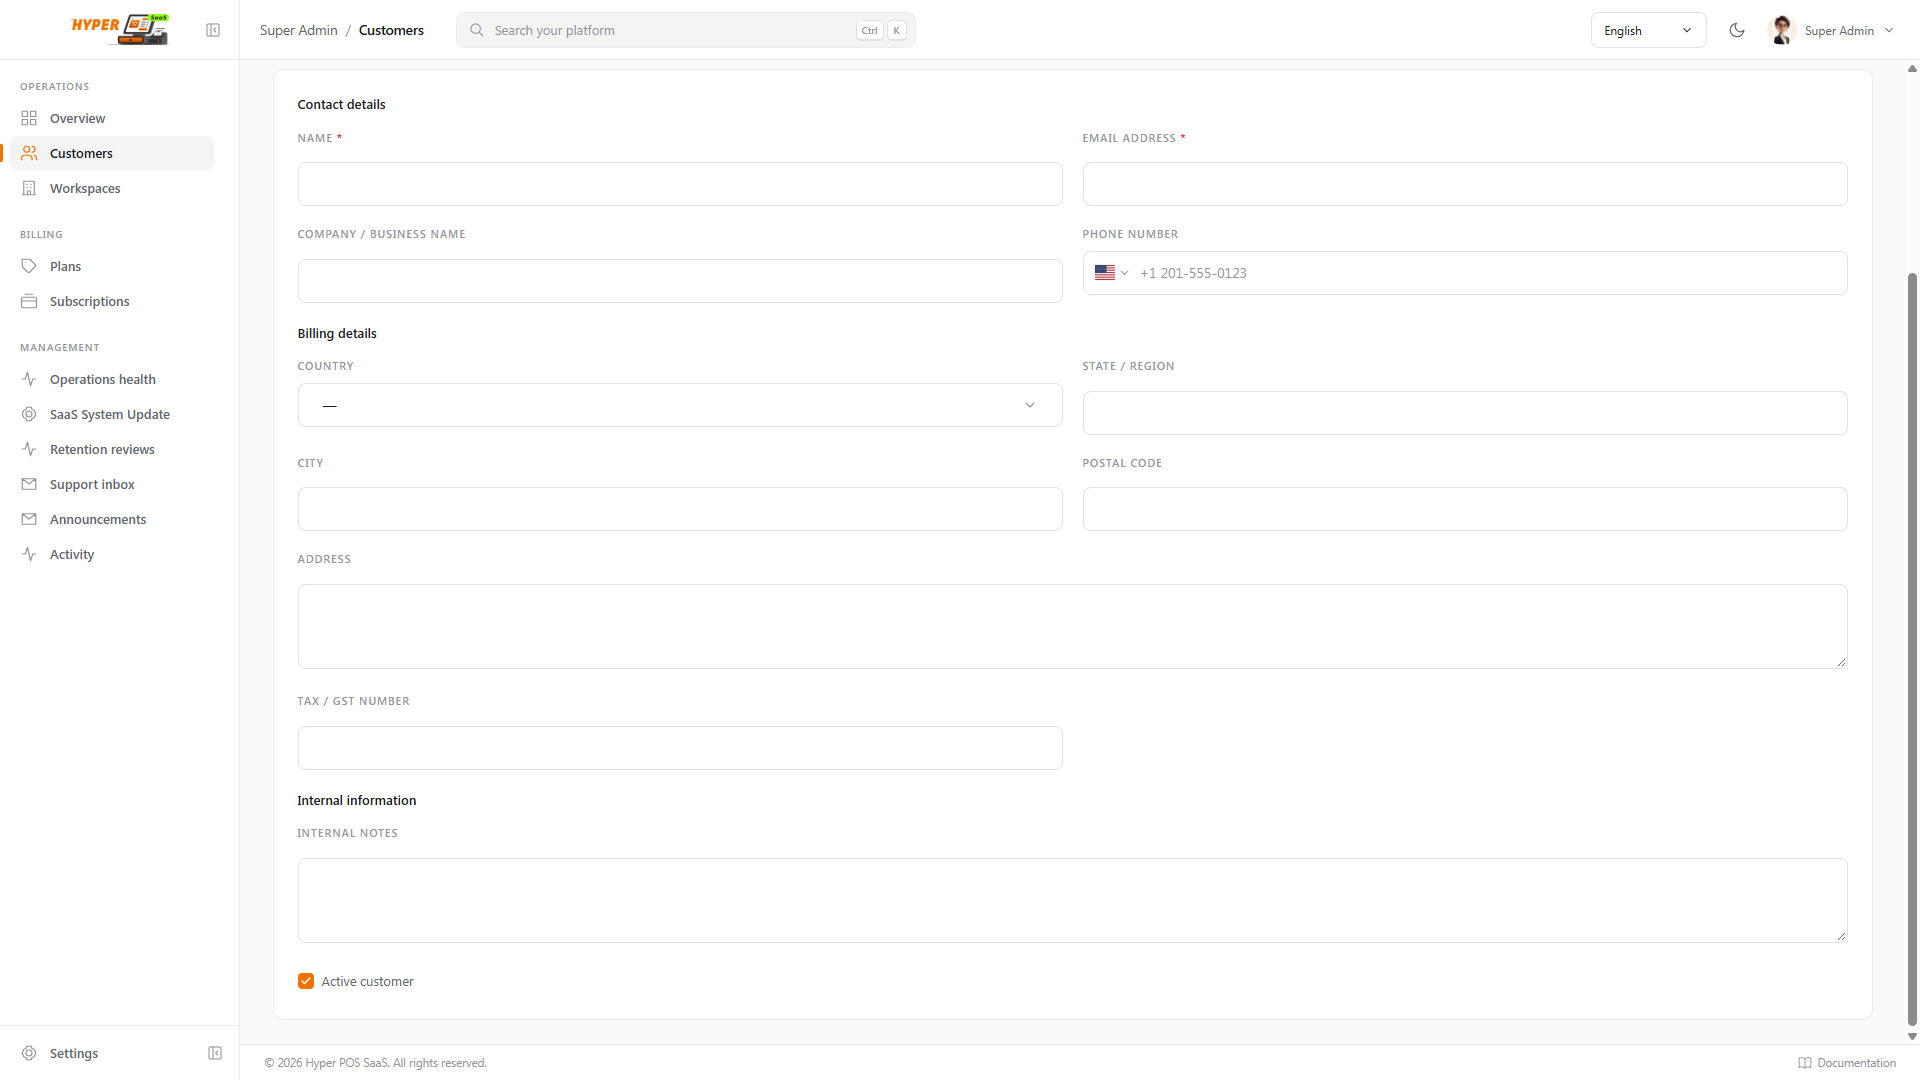
- Open Customers → New customer
Enter the customer name and a valid email. Set status to Active. Use the example Asha Shah and
asha@example.com. - Add optional business and billing information
Company name, phone, billing country/state/city/address/postal code, tax number and internal notes are optional. When supplied, the phone must use international format, for example
+919876543210. - Save and review
Check the customer’s email before proceeding. The management flow allows one workspace per customer record. If the customer already has a workspace, open that workspace instead of preparing another.
3. Publish and review the plan
Open Plans, save the draft and publish an eligible version. Review type, amount, currency, interval, payment collection, trial, grace/retention, features and store/user/terminal limits. A free plan provides a simpler first setup example. Paid plans need an enabled, verified gateway and compatible mappings before publication; manual renewal and automatic renewal have different capabilities. Publishing preserves an immutable version for subscriber terms.
4. Prepare the workspace record
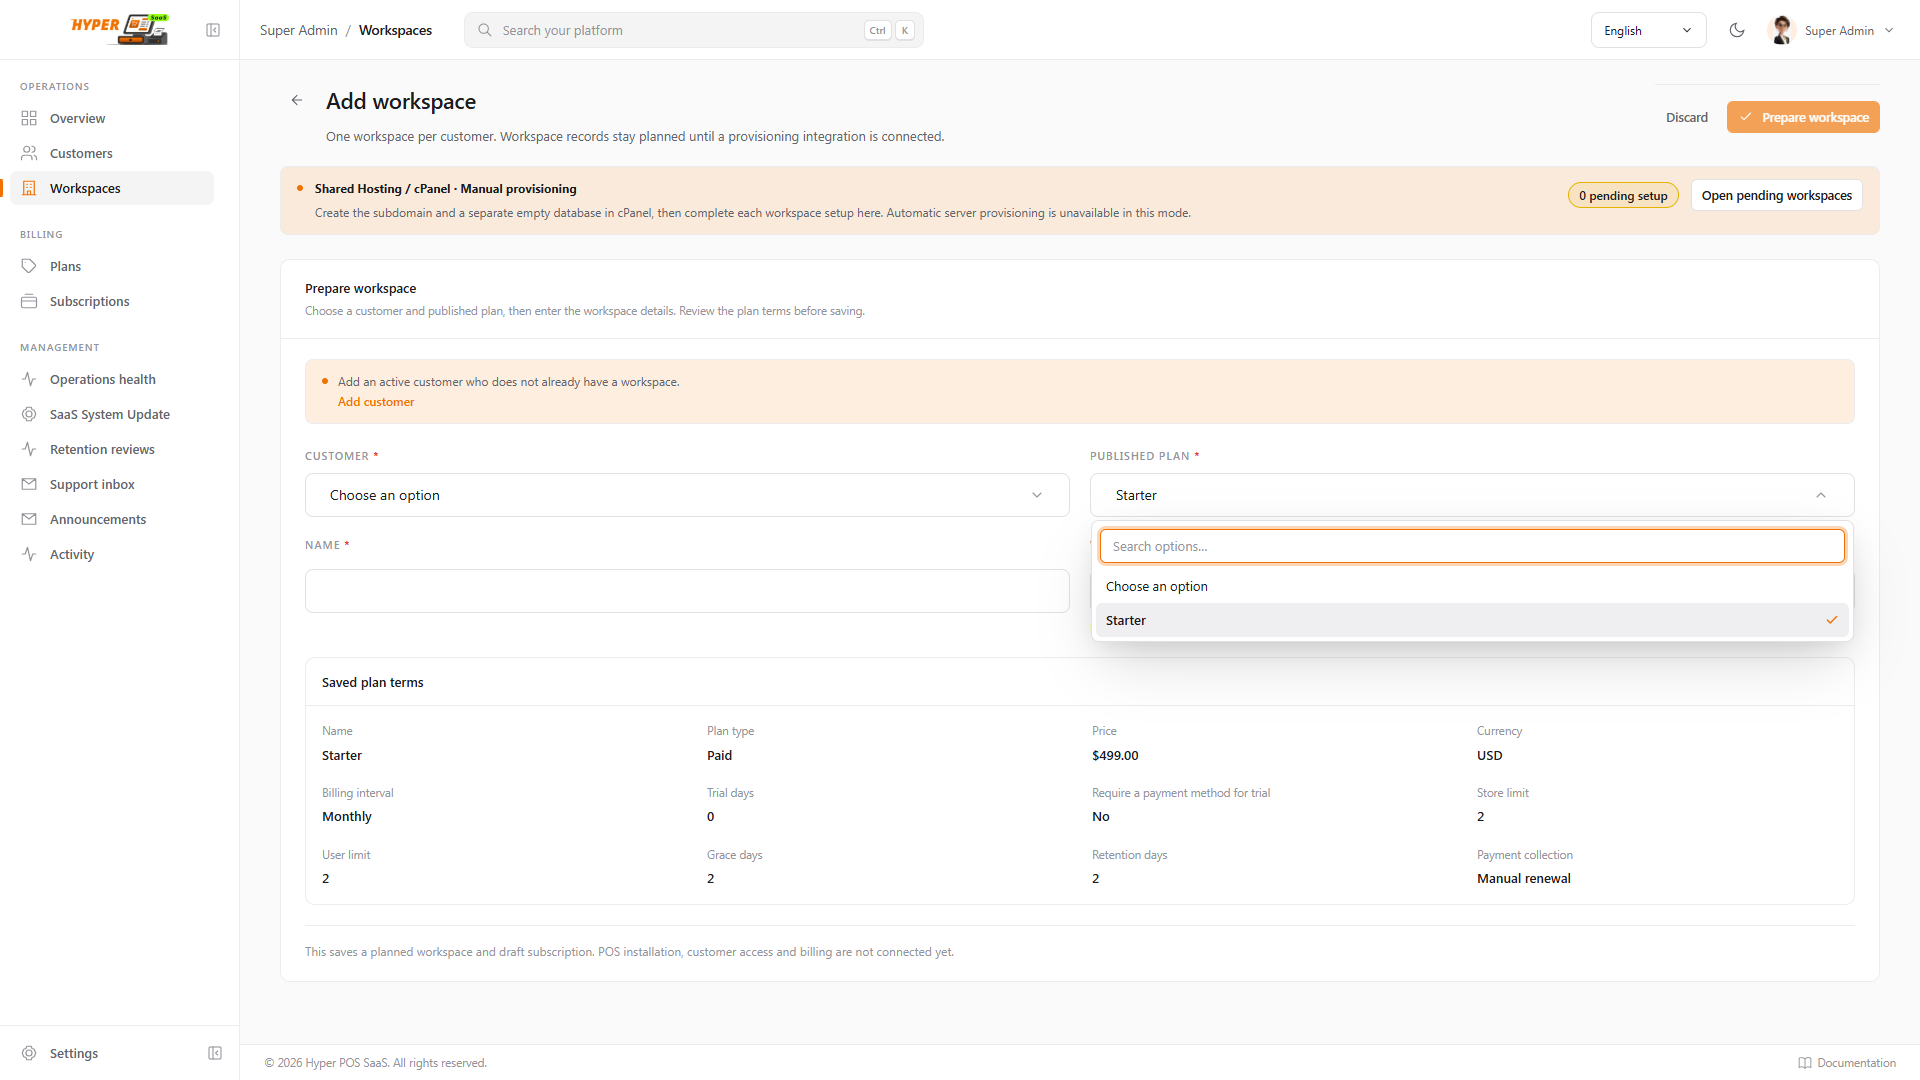
Open Workspaces → Prepare workspace, or use Prepare workspace from an eligible customer. Fill the four visible fields:
| Field | Required value | Example and rule |
|---|---|---|
| Customer | An active customer without an existing workspace. | Select Asha Shah · asha@example.com. |
| Published plan | The published version offered by the selector. | Select Starter and review the displayed plan snapshot. If the plan changes while the form is open, refresh and select again. |
| Name | A descriptive workspace name, up to 180 characters. | Asha Retail. This is not the hostname. |
| Slug | A unique address slug, up to 48 characters. | asha-retail. Start with a letter; use letters, numbers and single separating hyphens. No spaces, dots, underscores or trailing hyphen. admin, www, api, mail, support and platform are reserved. |
Select Prepare workspace. The server saves a planned workspace and draft subscription together and opens its Setup tab. This has not created a working POS yet. Keep this record and continue its setup if interrupted.
5. Establish the subscription access decision
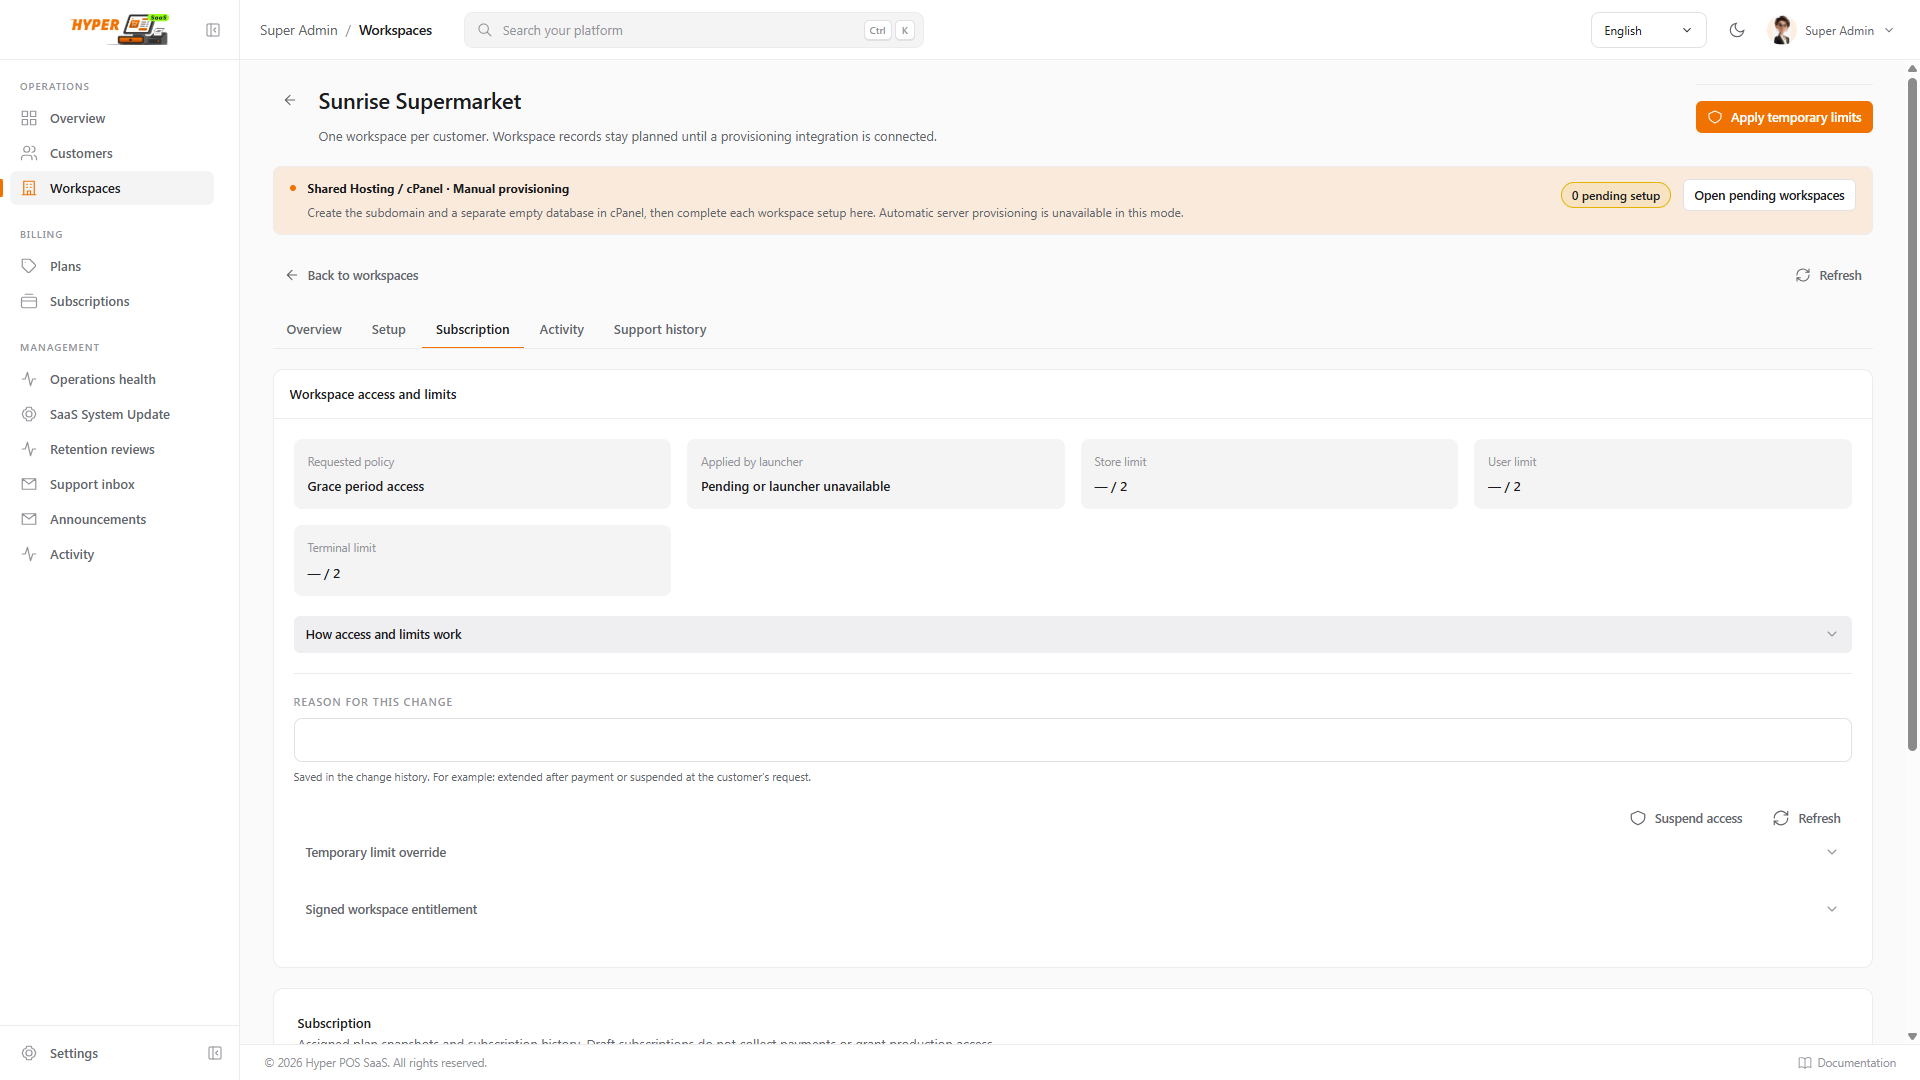
Open the workspace’s Subscription tab and its linked subscription. Preparing a draft subscription alone does not allow publication. Check the requested access state in Overview/Subscription.
| Flow | Action | What proves access |
|---|---|---|
| Manually prepared workspace without provider billing | When the manual agreement form is available, choose the published plan, status, start/end dates and reason, then save. | An eligible current agreement and an unsuspended workspace. Example for a disposable test on 5 October 2026: Active, start 2026-10-05, end 2026-11-05, reason “Initial test workspace”. Use dates appropriate to your current platform date. |
| Trial agreement | Choose Trial and supply a trial end within the start/end period. | Start cannot be in the future; the trial must not already have ended. Example: start 2026-10-05, trial end 2026-10-12, end 2026-11-05. |
| Scheduled agreement | Use a future start date. | Access waits until that date; a scheduled agreement is not immediate activation. |
| Customer self-signup / paid checkout | Use the subscriber enrollment and verified billing flow. | Free signup uses its own bound free-access agreement. Paid access comes from verified provider receipts and current billing eligibility; browser return or a draft record is insufficient. |
The manual form requires the end date to be later than the start date, optional trial end within the period, and a reason of at most 500 characters. Dates follow the platform timezone. It is not a payment receipt and must not be used to bypass an existing provider-managed subscription.
6. Shared hosting: prepare the workspace identity
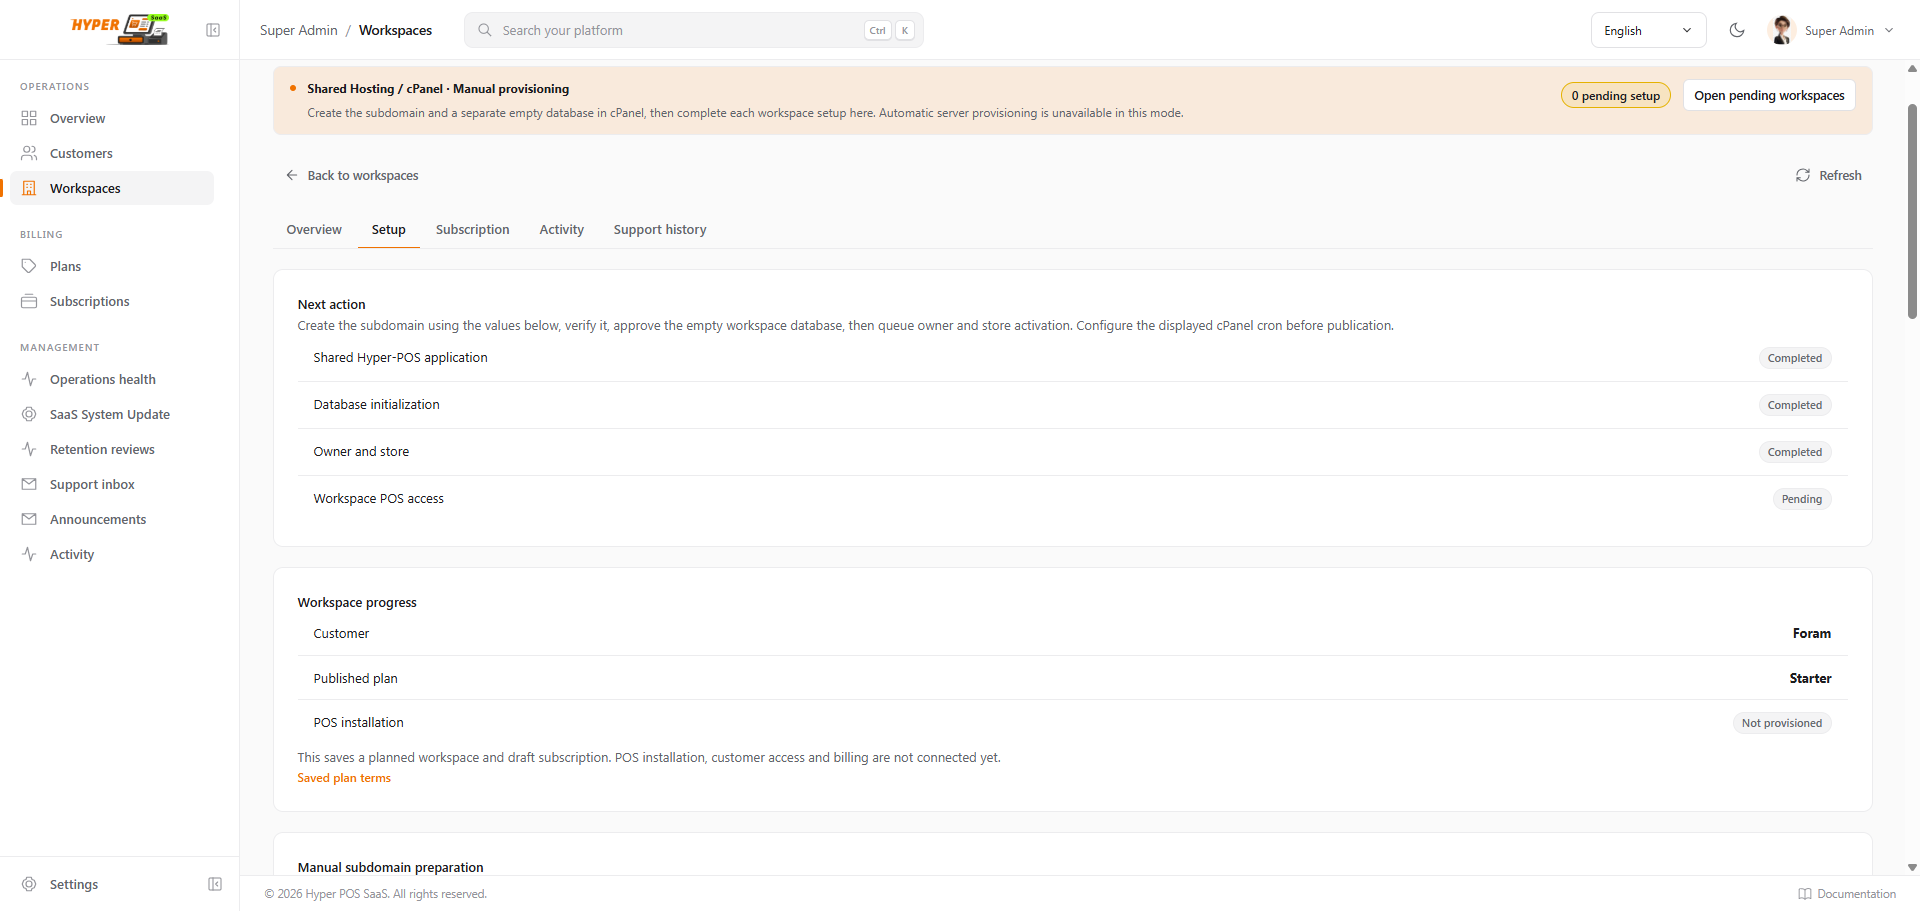
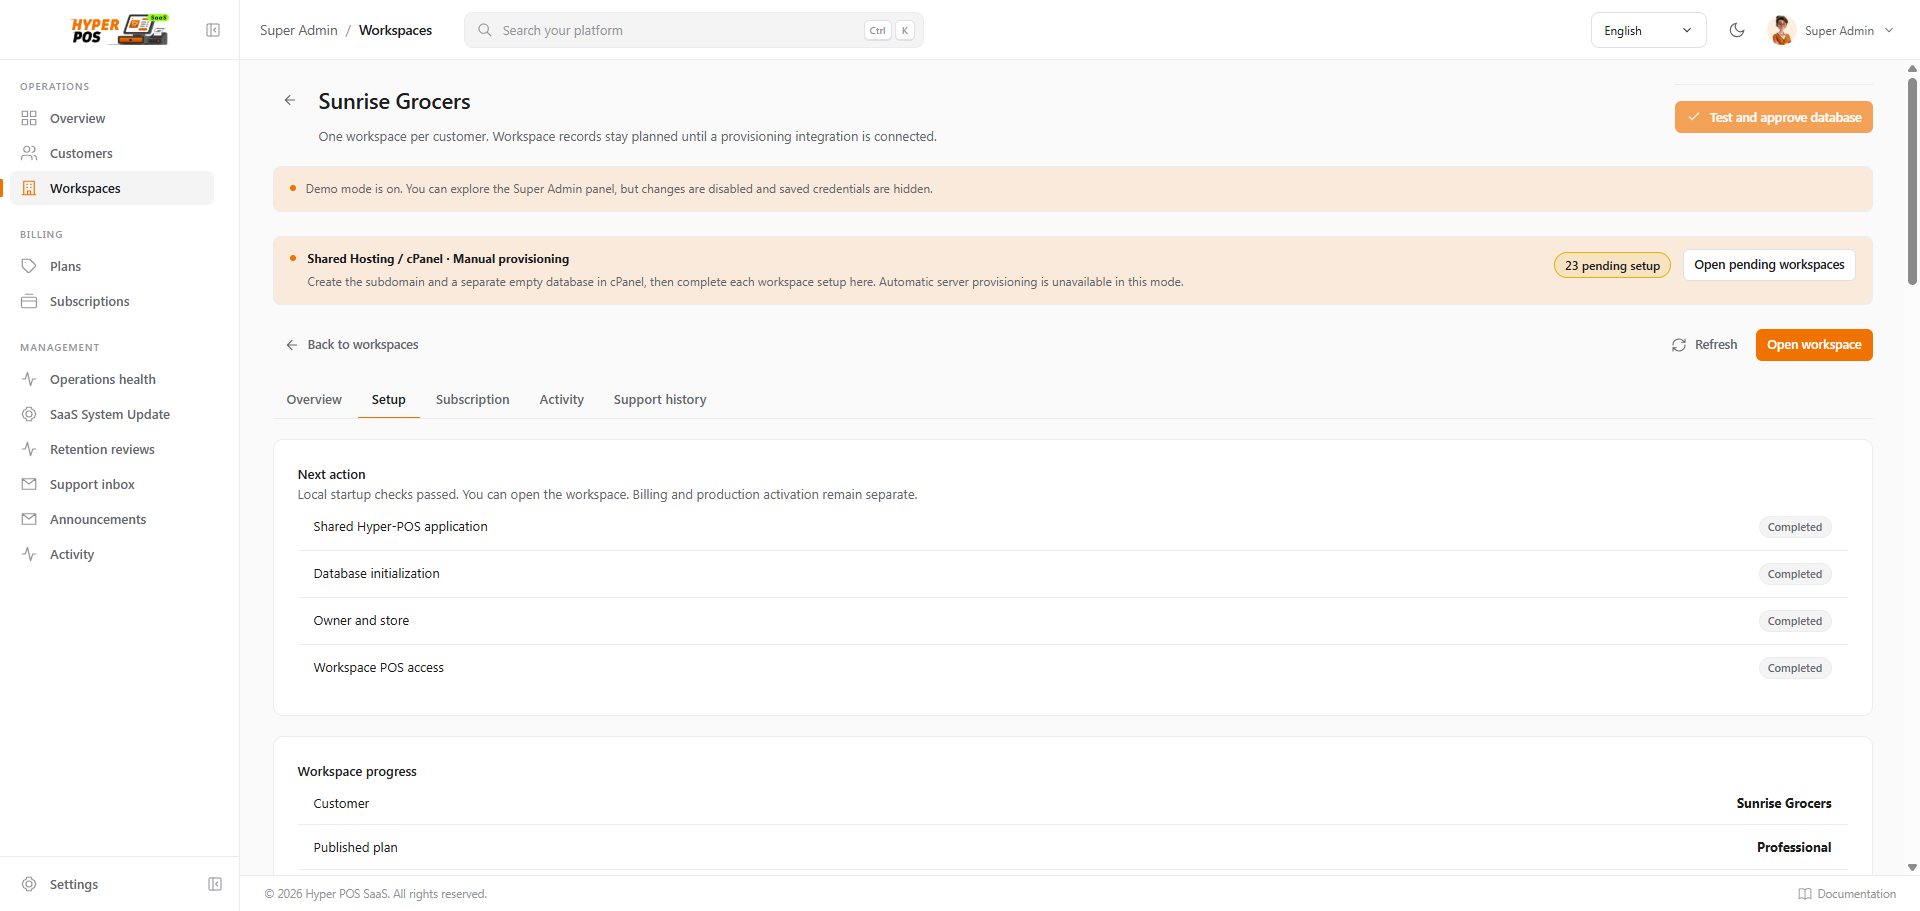
Open Workspaces → your workspace → Setup. If no allocation exists, select Prepare workspace setup in the progress card. This establishes the runtime identity needed by domain/database setup. It does not create a cPanel subdomain or MySQL database. Existing pending signup workspaces may already have this identity.
The shared panel should show Manual subdomain preparation, Manual tenant database approval, Initialize and activate workspace and cron health. If you instead see only the local allocation flow, check the installed release and validated hosting mode before continuing.
7. Create and verify the subscriber subdomain
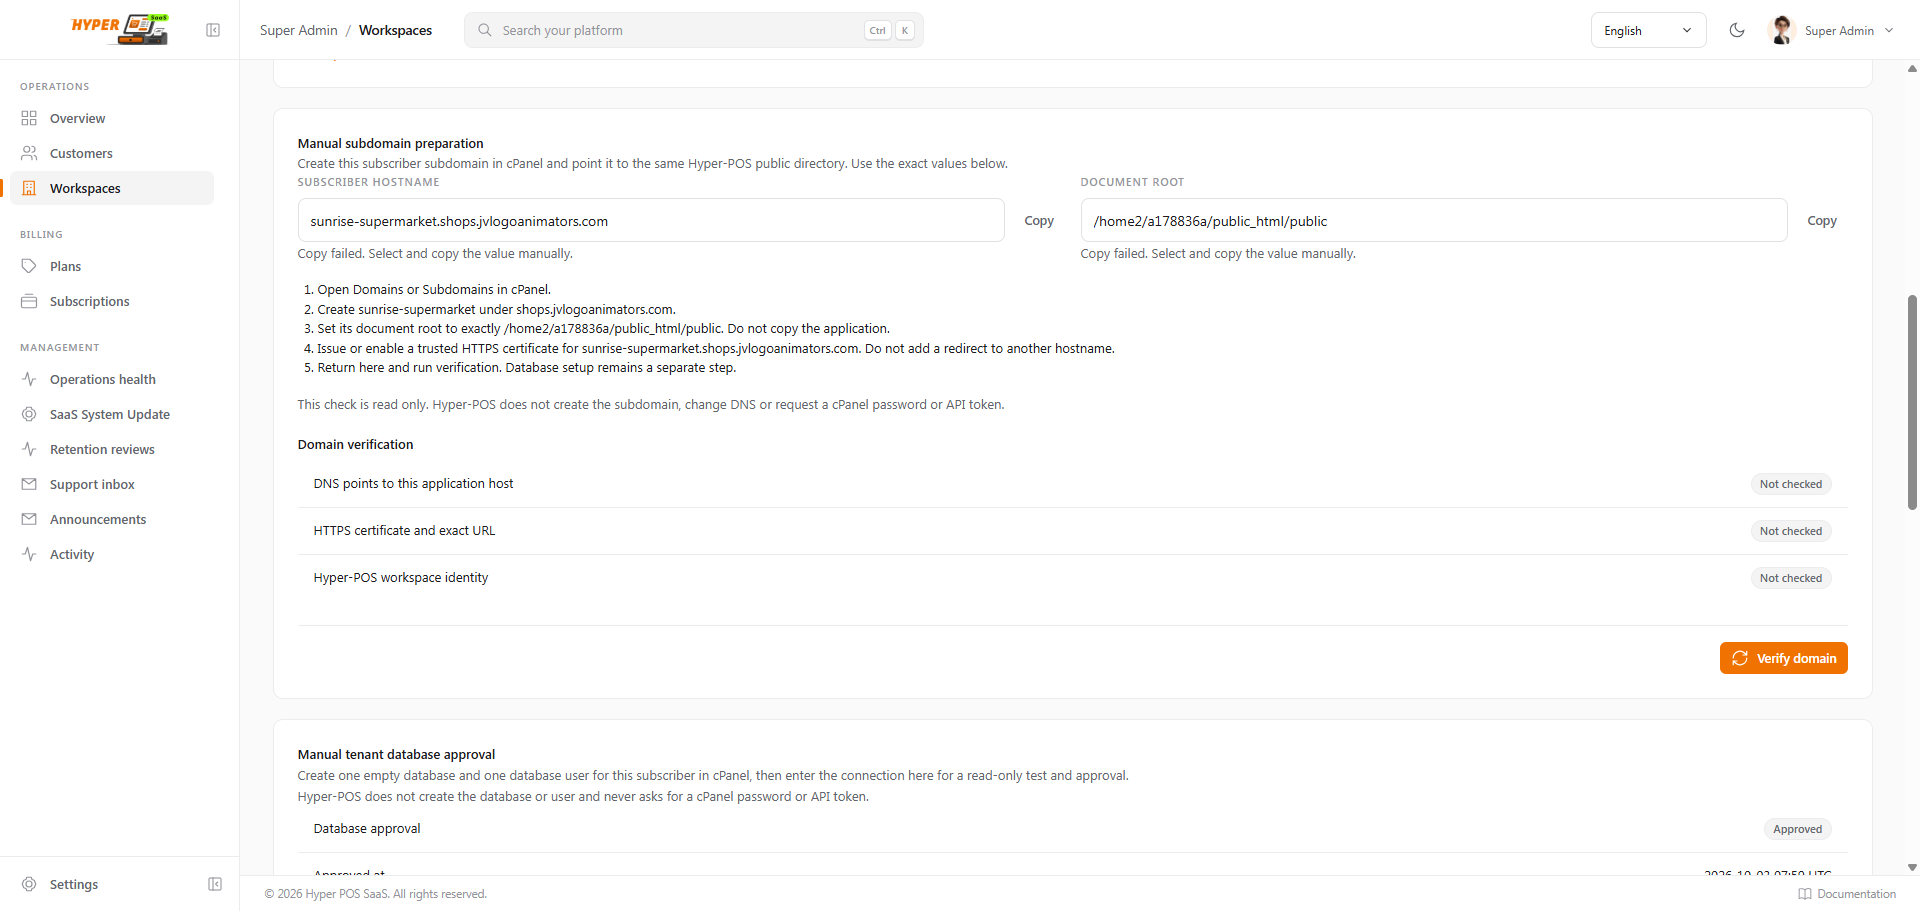
- Copy the exact values
Copy Subscriber hostname and Document root from Setup. The example hostname is
asha-retail.shops.example.com; the actual document root is generated by your deployment. - Create it in cPanel → Domains or Subdomains
Point the hostname to the displayed existing Hyper-POS
publicdirectory. Shared hosting uses the same application code with separate workspace databases and private runtime state; do not copy the application for every subscriber. - Enable HTTPS
Issue a trusted certificate covering that exact hostname. Ensure DNS points to the application host and the hostname does not redirect to the platform or another workspace.
- Return and select Verify domain
All three checks must pass: DNS, HTTPS/exact URL and Hyper-POS workspace identity. Loading a generic home page alone does not prove the correct application identity.
8. Create and approve an empty dedicated database
- Create database and user in cPanel
Create a new empty MySQL database and a dedicated user for this subscriber. Assign privileges only to that database. Do not use a root/global database account, the source POS database, platform database or another subscriber database.
- Enter the full cPanel-prefixed values
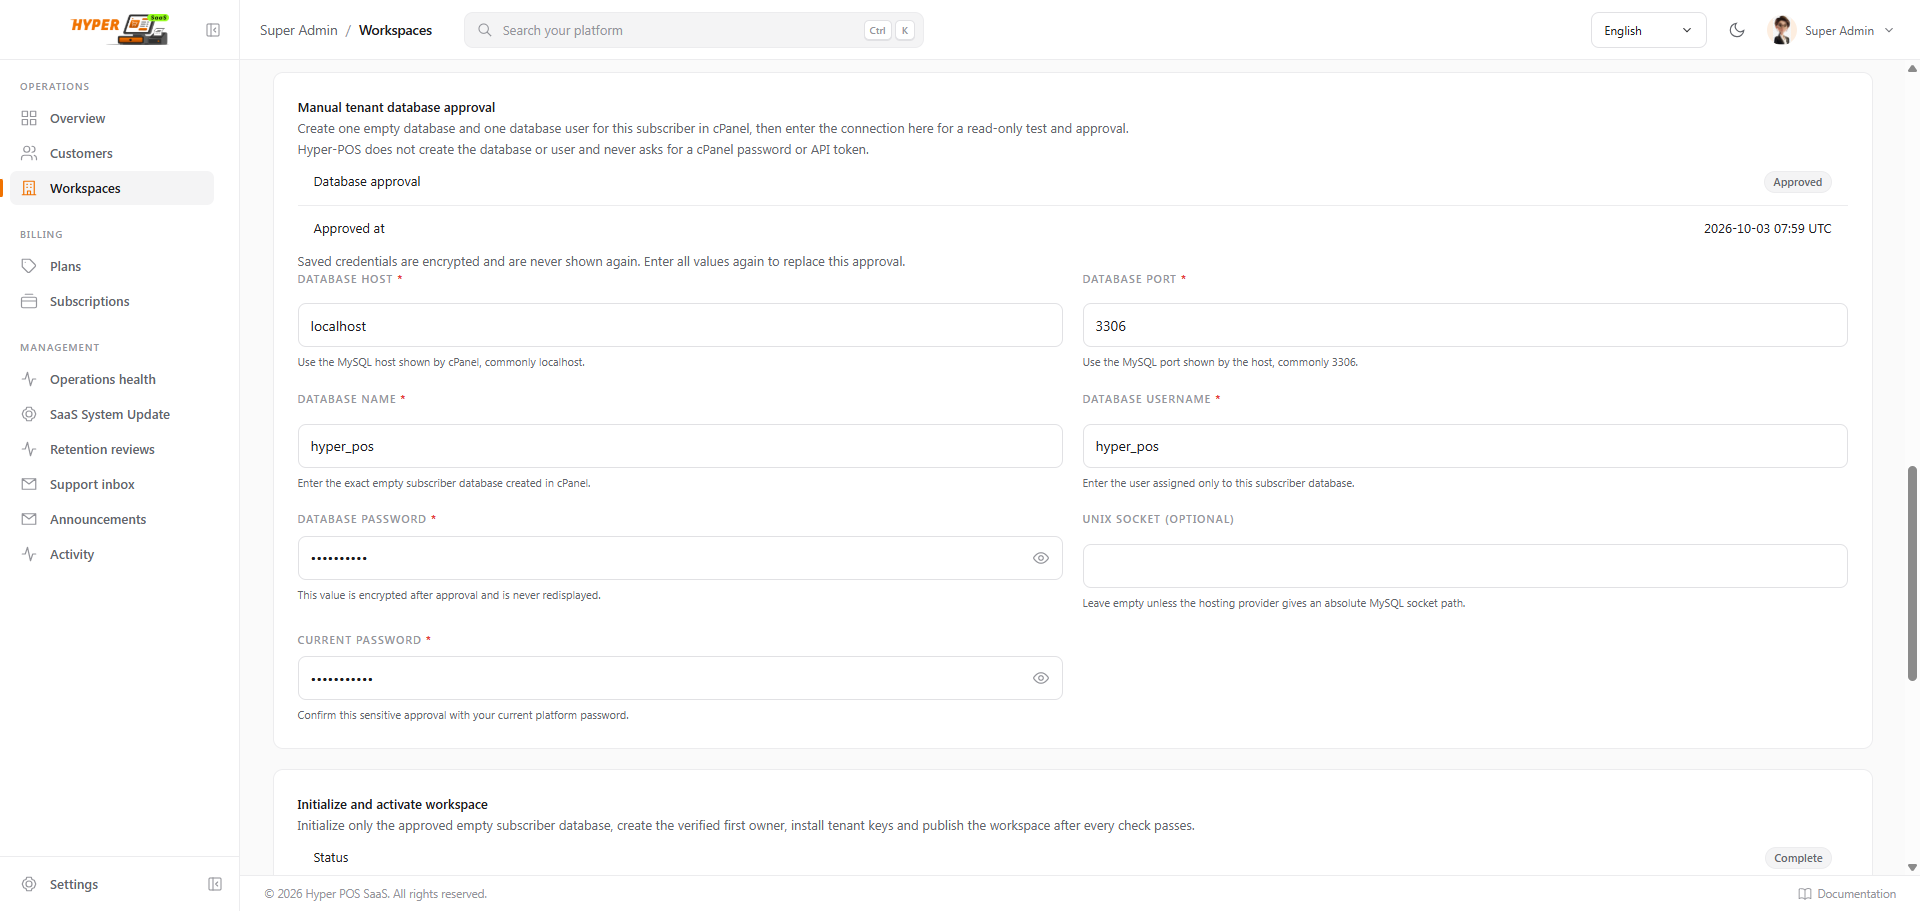
Open Manual tenant database approval. The examples below show the field format; generate and enter the actual secret privately.
| Field | Example | How to fill it |
|---|---|---|
| Database host | localhost | Use a configured allowed host. The default allowlist is localhost and 127.0.0.1; a provider hostname requires operator configuration before it is accepted. |
| Port | 3306 | Use the provider’s MySQL port, from 1 to 65535. |
| Database name | shopacct_asha | Include the full cPanel prefix. It must be empty and subscriber-specific. |
| Database username | shopacct_ashauser | A dedicated user scoped to that exact database. |
| Database password | Your generated database password | Enter locally in the protected field. Saved secrets are not displayed again. |
| Unix socket | Leave blank normally | Optional; use an absolute socket path only when the hosting provider supplies one. |
| Current password | Your Platform Super Admin password | Reauthentication for approving this connection; not the MySQL password or workspace owner password. |
Select Test and approve database. The check connects read-only, confirms the selected database, verifies scoped grants and checks that the schema has no tables. It does not create the database or initialize it. An approved result shows status/time; the credentials are stored encrypted and are not repopulated. If a stale-state message appears, refresh the workspace and review its current state before resubmitting.
9. Enter the first owner and store details
For a workspace created manually in Super Admin, fill Initialize and activate workspace after database approval. For a self-signup workspace, retain the details/password gathered by that journey and follow its pending setup actions. Do not assume a manually prepared workspace automatically has a signup account or password-setting invitation.
| Field | Example | Requirement |
|---|---|---|
| Owner name / email | Asha Shah / asha@example.com | Required. Check the actual POS owner identity; the form prefills customer contact values. |
| Owner password / Confirm password | A privately chosen unique password | Required and matching. At least 10 characters, at most 72 bytes, including a letter, a number and a symbol. Do not include a real password in screenshots. |
| Company name | Asha Retail Pvt Ltd | Required; business name for this POS. |
| Store name / Store code | Asha Retail Main / MAIN | Required. Store code is at most 32 characters and uses letters, numbers, underscores or hyphens; it starts with a letter or number. |
| Store address | 12 Market Road, Pune | Required physical business address. |
| Country | India / IN | Choose a country offered by the form. |
| Base currency | INR | Choose the POS base currency; it does not change the billing plan currency. |
| Timezone | Asia/Kolkata | Choose the business timezone. |
| Language | English | Choose an active language offered by your installation. |
| Industry | Retail | Choose Retail, Pharmacy or Supermarket. |
| Current password | Your Platform Super Admin password | Confirm the sensitive activation request separately from the new POS owner password. |
Review the target workspace and database, select Queue workspace activation and confirm. This product action initializes schema/essential data, creates the first owner and installs tenant keys. Run it only when you intend to initialize the approved empty workspace database. This documentation update has not executed it.
10. Confirm the single scheduler entry
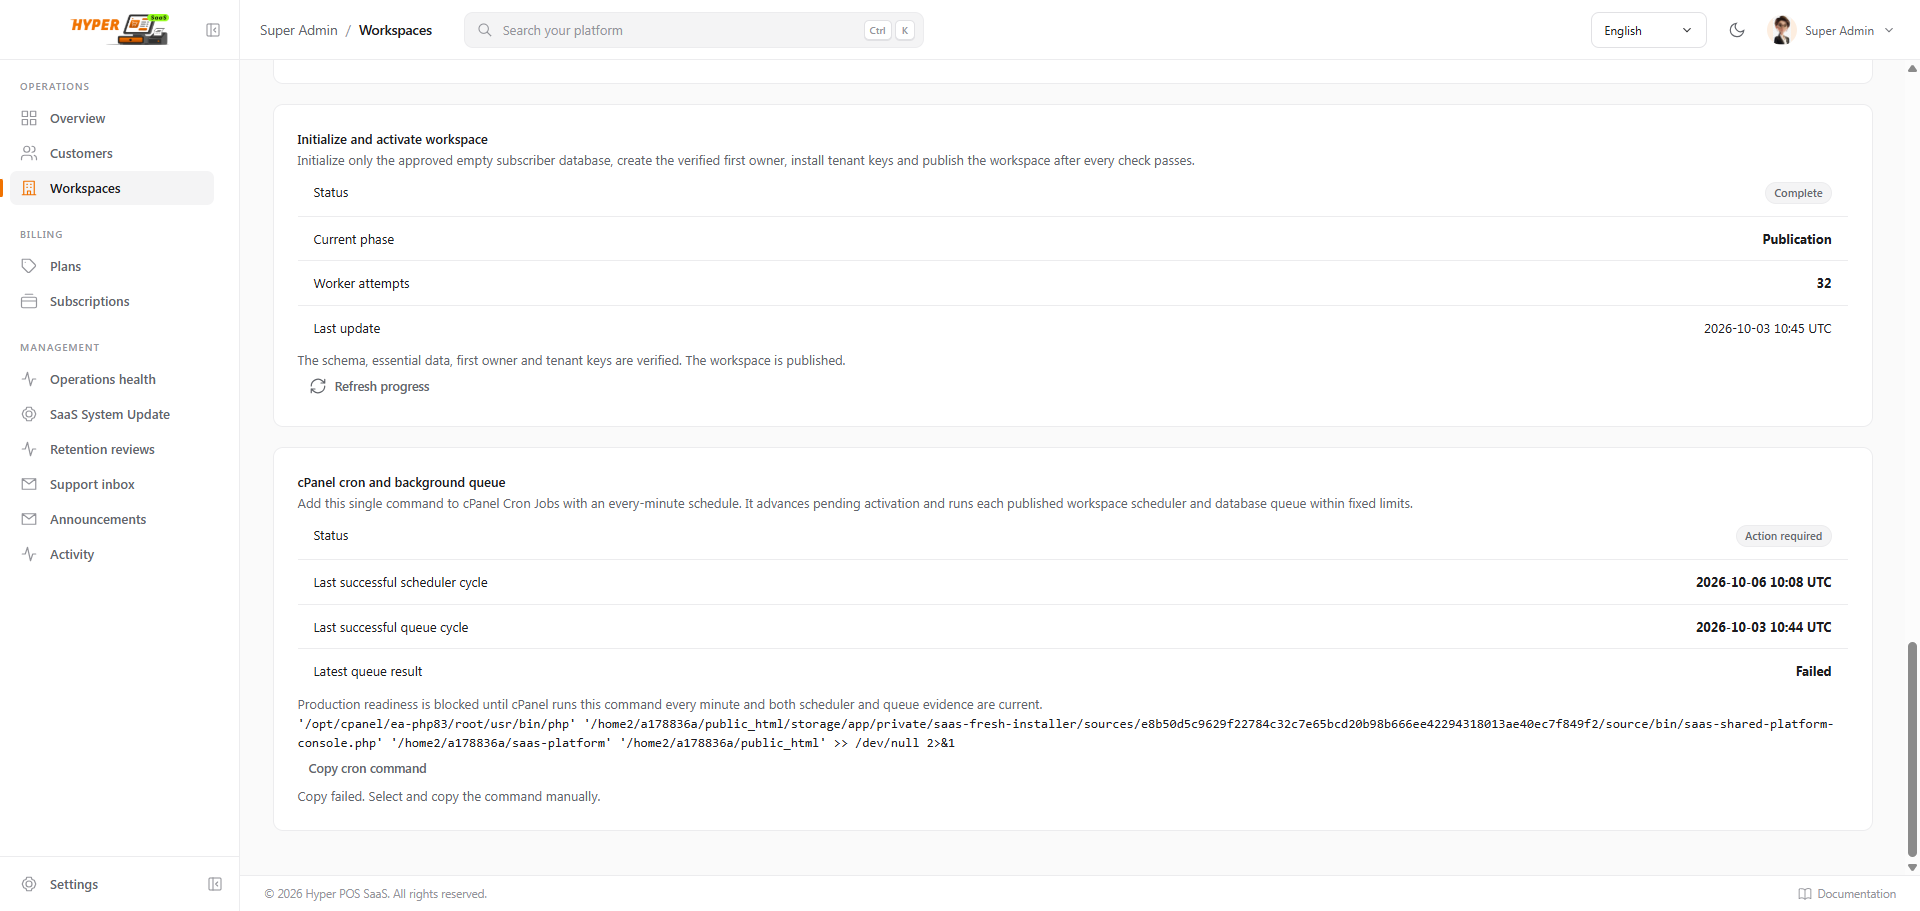
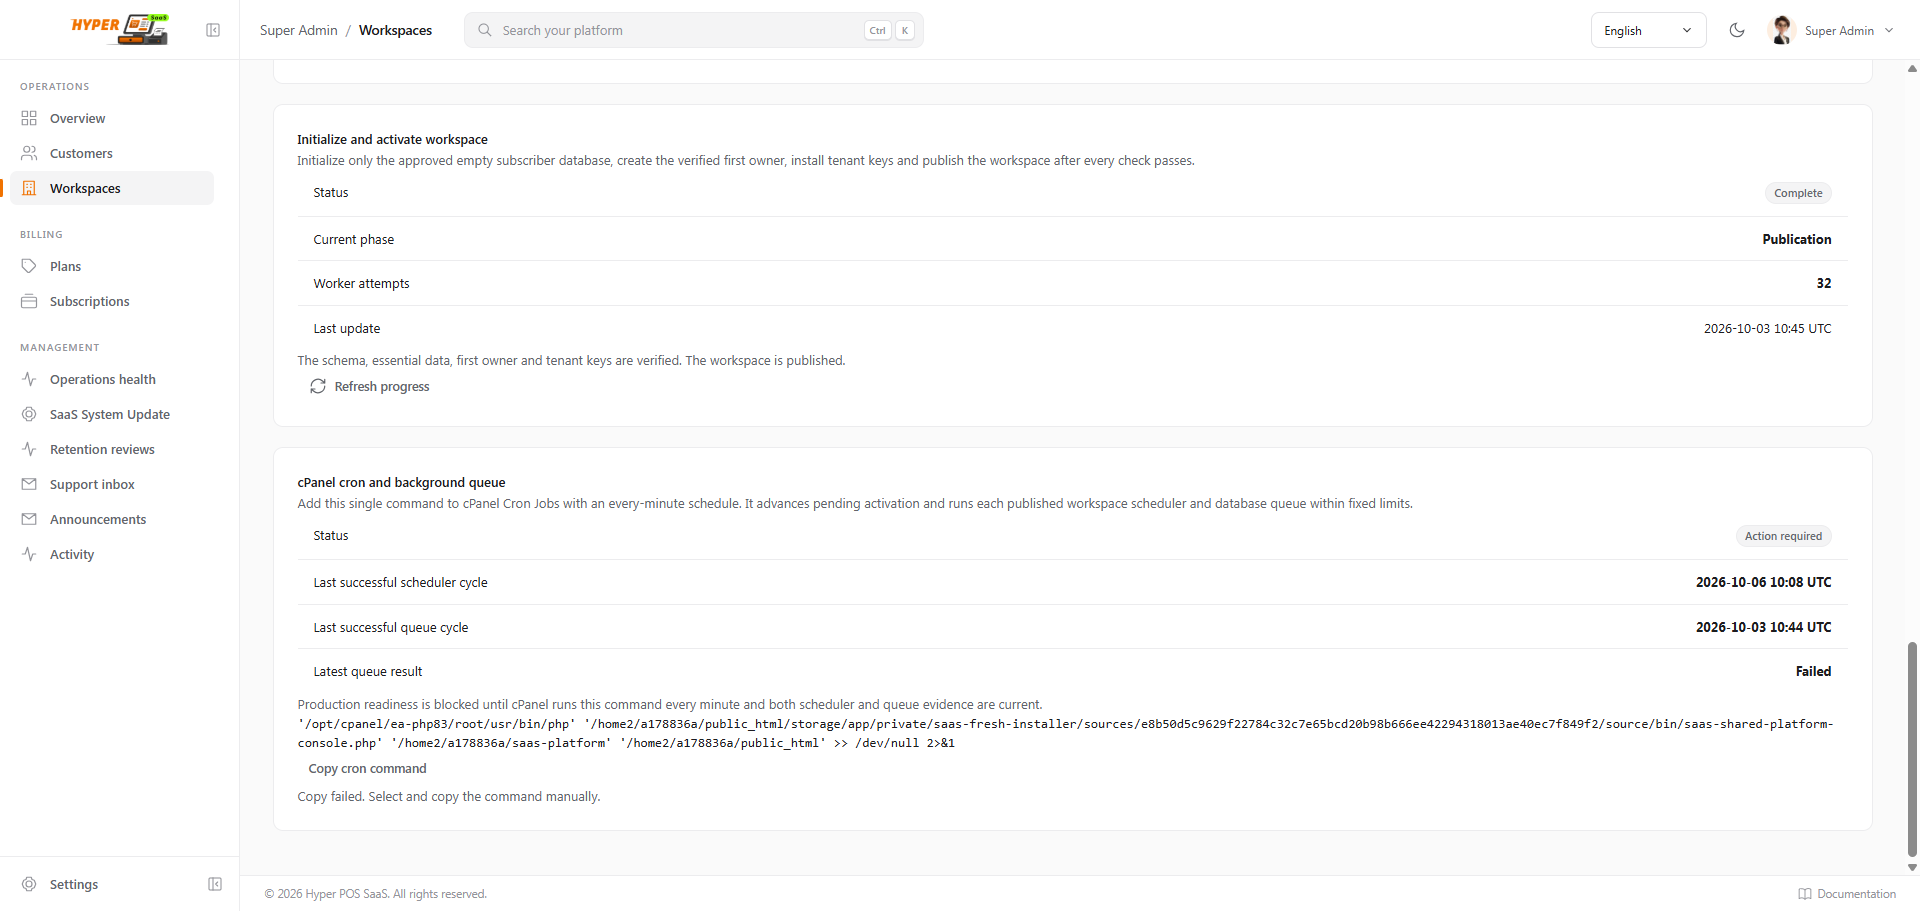
Copy the exact command from the workspace cron card and add it to cPanel → Cron Jobs → Once Per Minute. Check Scheduler last success and Database queue last success/result. Refresh after allowing scheduler cycles to run. Avoid duplicate cron entries.
The deployed separate platform bridge uses saas-shared-platform-console.php with detected platform/core paths because it has no artisan executable. A Laravel host may show artisan schedule:run. Copy the command actually shown by your panel; these are deployment-specific alternatives. No permanent queue worker, Redis service or per-workspace cron is required by this flow.
11. Read progress and wait for publication
| Status / phase | What it means | What to do |
|---|---|---|
| Queued / Running | The bounded worker has pending or claimed work. | Keep the existing record and check cron evidence. Refresh progress; do not create a duplicate workspace. |
| Database schema | Apply and verify the approved schema in the subscriber database. | Wait for the worker result. A browser timeout does not prove failure or completion. |
| Essential data → First owner → Final verification | Seed required data, create the bound owner and verify initialization/tenant keys. | Inspect the named phase if it cannot advance. Retries check existing evidence and must not replace another installation. |
| Needs review | The phase did not produce verified evidence. | Fix the named prerequisite and inspect worker output privately. Shared activation can inspect/resume the recorded phase; if it repeats, request operator review without deleting the journal. |
| Waiting for publication | Initialization passed but publication is still gated. | Check current subscription access, suspension, unchanged workspace/database binding and fresh scheduler/database queue health. |
| Complete / Ready | Initialization and publication passed. | Confirm Open POS is offered and perform the checks below. A planned management status can remain visible; use readiness and applied access as the operational evidence. |
12. Open POS and verify the workspace
- Open the workspace
Use Open POS. Verify the correct HTTPS subscriber hostname. If a pending page appears, return to Setup instead of running the ordinary POS installer.
- Complete the applicable owner path
For a manually created workspace, use the owner credentials established during activation. For subscriber enrollment, use its verification/activation link when offered. A readiness email announces availability; it is not automatically a new password-setting invitation.
- Check business settings
Verify company, first store, currency, timezone, industry, language, owner permissions and the purchased plan limits.
- Test with disposable business data
Create a test product, record stock, complete a small sale and inspect the receipt. Check a support request and current backup evidence. Test a second workspace to verify separate products, sales, users and sessions.
- Review access and operations
Check requested versus applied access, current signed entitlement and recent health. Record successful checks before inviting real customers.
Customer self-signup and paid enrollment
Subscribers visit /subscribe, choose a published plan, and follow its checkout/account-verification sequence. Paid onboarding also appears in the Super Admin paid setup queue. Complete the requested company, slug, owner name/email, country, currency and timezone fields; then continue the workspace’s hosting setup. The subscriber path collects its own password and owner activation details. Subscribers do not provide purchase codes, cPanel credentials or MySQL credentials.
On shared hosting, the subscriber sees a waiting page while Super Admin handles the domain/database stages. After verified readiness, configured SMTP sends the readiness message with bounded retries. Verify delivery status and use the available resend action after correcting mail problems.
VPS setup and local development
For VPS, use the VPS guide and the signed, approved runner. Review domain/runtime/database allocation, initialization, owner creation, routing and recent host health. Do not apply the shared cPanel database form to an automatically provisioned VPS workspace. Linux user/filesystem isolation and native runner acceptance must be verified separately.
Local development may show allocation, database inspection, initialization preview, owner setup and serving actions. A localhost URL or successful local file copy does not prove production DNS, TLS, SMTP or host isolation. Follow the setup controls supplied by the active deployment.
After activation
Use Overview for readiness/identity, Setup for hosting progress, Subscription for limits and billing/access, Activity for audit events, and Support history for support sessions. The POS owner can open Subscription → Renew / Manage billing when eligible. Manually prepared workspaces can link billing access only when the original POS owner and active customer emails match and no conflicting subscriber account exists.
For failures, follow workspace troubleshooting. For updates, recovery and support, read Operations & support.