Shared Hosting / cPanel setup
This mode works without root access. You perform the hosting-panel tasks that an ordinary PHP account cannot safely automate. The application creates its own internal directories during setup.
Create a subdomain and an empty database with a dedicated user for every subscriber. You can later move to a supported VPS/root host if you want reviewed automatic provisioning.
Before opening the installer
| You do in cPanel | Exact result to check |
|---|---|
| Choose PHP 8.3 | The site and cron PHP binary use compatible PHP and required extensions. |
| Create platform subdomain | For example platform.example.com. Use the exact document root shown by the setup screen or supplied deployment profile. Enable HTTPS/AutoSSL. |
| Create platform database | A new empty MySQL database and dedicated user; grant the privileges requested by setup. Record the cPanel-prefixed database and username. |
| Set up email | Have SMTP host, port, security mode, username, password and sender address ready. Test that owner mail reaches your inbox. |
| Confirm host limits | Private application storage, enough disk/memory, and one once-per-minute cron entry are available. |
The private platform release in the current preview
The current existing-owner cPanel setup checks for a signed platform-release.zip in a private server path. The hosting administrator must upload the publisher-supplied file outside the web root, verify its SHA-256 against the publisher’s notice and configure the release path/checksum and private platform root in the Hyper-POS environment. Setup will show a trusted runtime release not configured error until this is done. The add-on ZIP alone does not provide this runtime.
There is no browser field in the current existing-owner setup that uploads the platform runtime. Ask your hosting provider or technical operator to complete this private release configuration. Do not invent a file path or paste credentials into public folders.

Complete the browser setup
- Open the add-on’s guided setup
After owner proof, visit
/operator/setup. Choose Shared Hosting / cPanel — manual provisioning. - Enter platform details
Use the platform hostname, subscriber hostname base and separate empty platform database you prepared. Save this configuration, then complete the separate SMTP verification and deployment connection steps offered by setup. Passwords are not repopulated after validation errors.
- Run and fix preflight checks
The page checks package trust, current source database, capacity, private paths, isolation, HTTPS, email and scheduler. Fix failed items and use Continue checks.
- Add the one cron entry
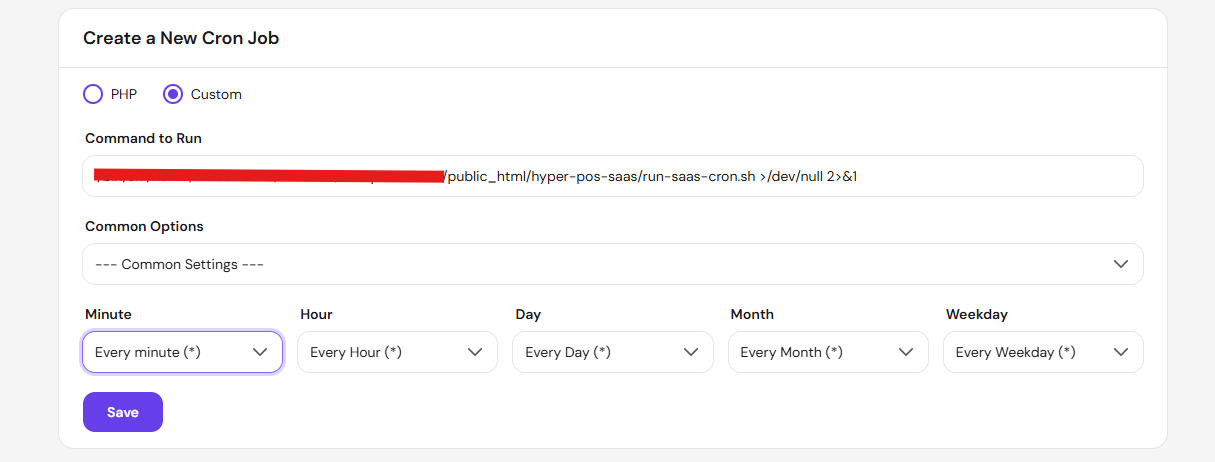
Copy the exact command displayed by the installer. In cPanel → Cron Jobs select Once Per Minute (* * * * *), paste it, save, then confirm the setup acknowledgement.
- Test SMTP and complete setup
Send the setup test email and confirm its code. Select Complete shared-hosting setup, then Install platform. The browser continues one bounded installation phase at a time.
- Activate Platform Super Admin
Open the activation link, use the owner invitation and create the platform password. Verify login over HTTPS.
What command goes in cPanel?
Use the command shown by your installer; paths differ between hosts. Its shape is:
cd '/absolute/hyper-pos/path' && '/detected/php/path' artisan schedule:run >> /dev/null 2>&1Paste that line into cPanel Cron Jobs. You do not run sudo, Composer, npm, a queue worker or a per-subscriber cron command in cPanel Terminal.
Cron for the separate platform bridge
The deployed Super Admin workspace card may show saas-shared-platform-console.php rather than the earlier Laravel-host artisan example. The separate bridge has no artisan file. Always copy the current generated command and its detected PHP, platform and core paths; verify recent scheduler and database queue success before publication.
For every new subscriber
- Read the pending workspace
In Platform Super Admin open Dashboard → Pending subscriber setup or Workspaces → Continue setup. Copy the exact requested hostname and document root.
- Create the subdomain
Create it in cPanel, point it to the displayed document root, enable HTTPS and return to the workspace’s domain verification step.
- Create an empty database and user
Use a fresh database and dedicated user only for this subscriber. Never reuse the platform or another subscriber database.
- Approve and activate
In the protected workspace setup form enter the database details, confirm your Super Admin password where asked, then start the resumable activation.
- Check cron and owner invitation
The single cron entry advances bounded background work. Wait for publication and Ready, then use the applicable manual-owner or subscriber activation path and open POS.
Use the complete workspace guide for every visible field, example and activation phase.
When to consider VPS
If your host cannot provide PHP 8.3, separate databases, private paths, HTTPS, once-per-minute cron or enough capacity, the setup should stop. For larger subscriber counts or automatic provisioning, use a supported VPS with root access and follow the reviewed migration procedure instead of changing the hosting mode in place.